
Stack is a pile of objects. In real world, we can see stack of plates, stack of books and so on. Here, I have drawn a stack of 5 books:
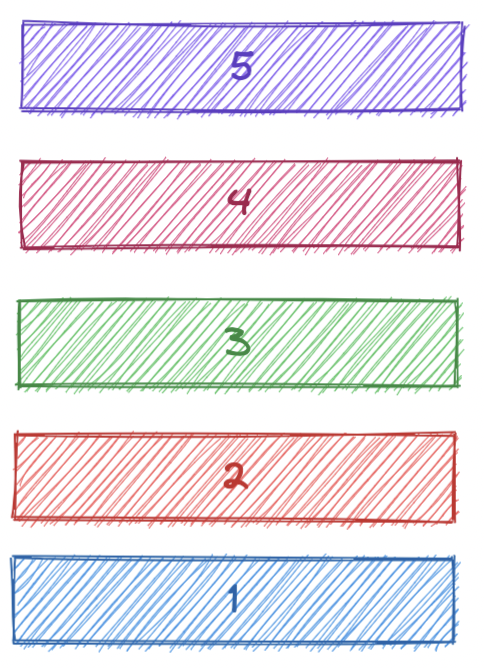
Book 5 is on top and Book 1 is at the bottom.
LIFO
In a stack, the last book kept(Book 5), is taken first. We cannot take Book 4 without first taking(popping) Book 5.
LIFO stands for Last In First Out.
The Last In book(Book 5) is First Out.
Is Stack a Data Structure or Algorithm?
Stack is considered as a Data Structure because in a stack, data follows a predefined structure.
This type of structured data has its own applicatons like:
- Evaluation of arithmetic expressions
- Syntax checking of languages
- Back tracking
- Reversing a string
- Processing function calls(Call Stack)
Diving In
The example of stack of plates or books is good. But, bringing the concept to programming is difficult. How can I crack it?
This is a major problem for most of us. Let us think about different aspects related to this problem.
Memory
When I drew the stack of 5 books one on top of another, it was very pleasing and easy to visualize. But, in reality if I need to store 5 books, we cannot tell computer to store information about 5 books one top of another in memory.
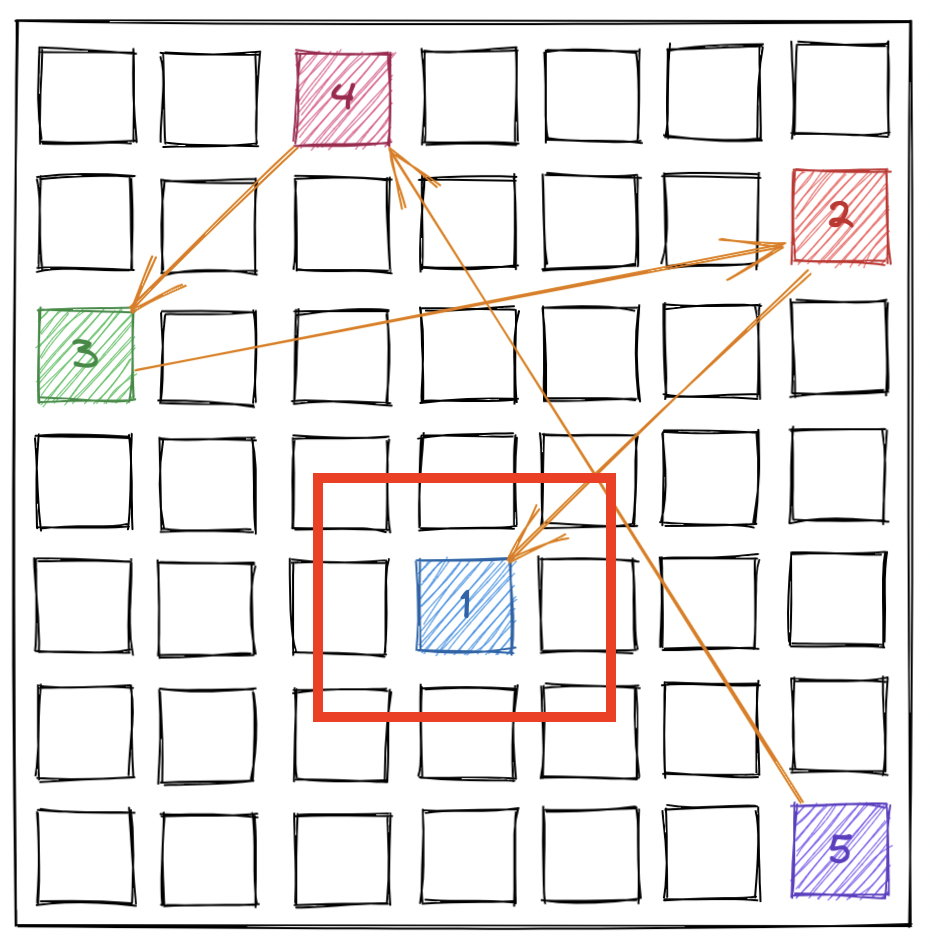
Memory is like a grid. There, computer stores items where there is space. So our 5 books might be stored like below in memory:
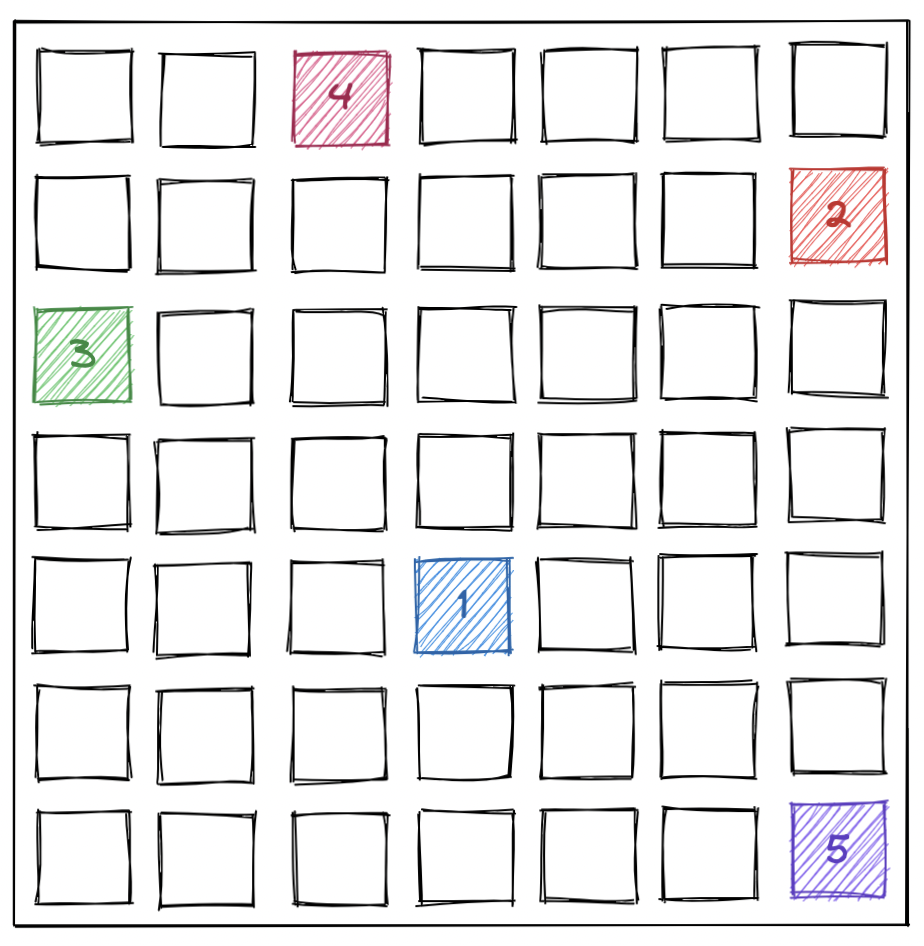
Oh Jeez! now what?
Perception
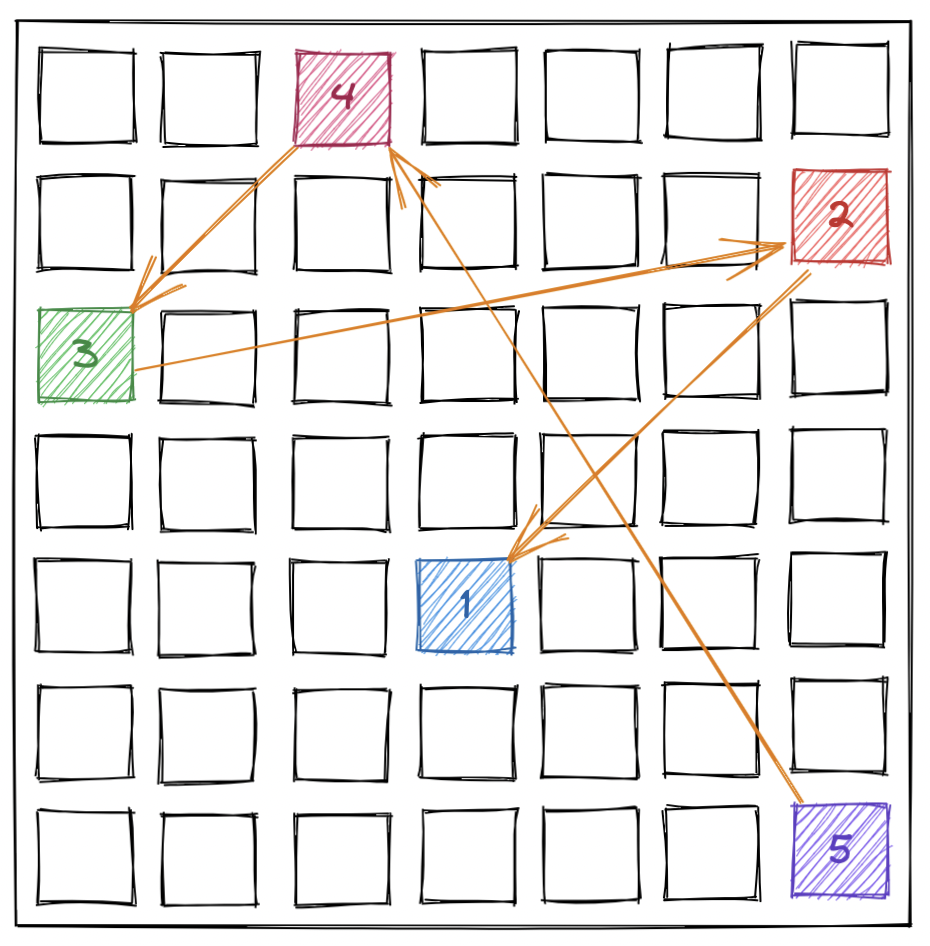
Even though, the 5 items are scattered in memory, we need to give a perception to the user that, item 5 is on top item 4, item 4 is on top of item 3 and so on.
Then only, for the user the entire structure looks like a stack.
So, the top most book(head) is book 5. It should have a link to the previous book which is, book 4. Like that, there should be a link from all the books to its previous one.
The Node
So far, we identified the items in a stack as either book or plate. We cannot go like this for ever. There should be some generic name. That is Node.
Now onwards, we will not say that, 5 books are stored in memory. Instead, 5 nodes are stored in memory.
Let us zoom in to one node(Say, Node 5).
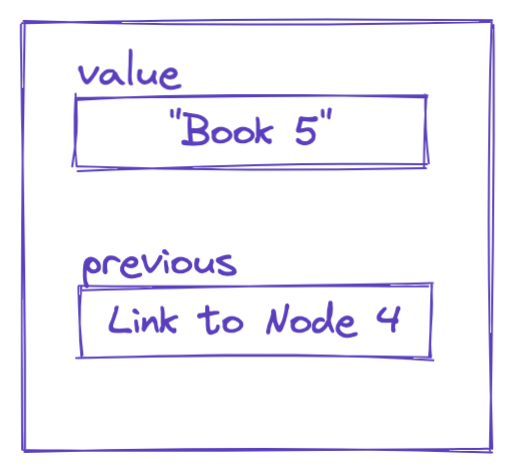
What I am trying to convey here is, every node should have a provision to store a value. Also, it should have some mechanism to link to previous node.
In JavaScript, an object is the best way to represent a node. Let us plot node 5 as an object.
const node5 = {
  value: "Book 5",
  previous: <Link to Node 4>
}
Similary, node4 will look like below:
const node4 = {
  value: "Book 4",
  previous: <Link to Node 3>
}
I have written <Link to Node x>. In reality, how can we link from one node to another node? That is discussed below.
Linking Nodes
Ok Ok. I understood that there should be nodes and they should be linked. How?
For that, we need to brush up our knowledge on how JavaScript objects are stored in memory.
Consider the following code in JavaScript:
const obj = {
  name: "Joby",
  age: 37,
};
How this object is stored in memory?
Well, JavaScript engine store the object somewhere in the memory in its own way. We do not have to worry about that now. And then, the address of that memory is stored in obj. Technically, we say obj stores the reference to the object.
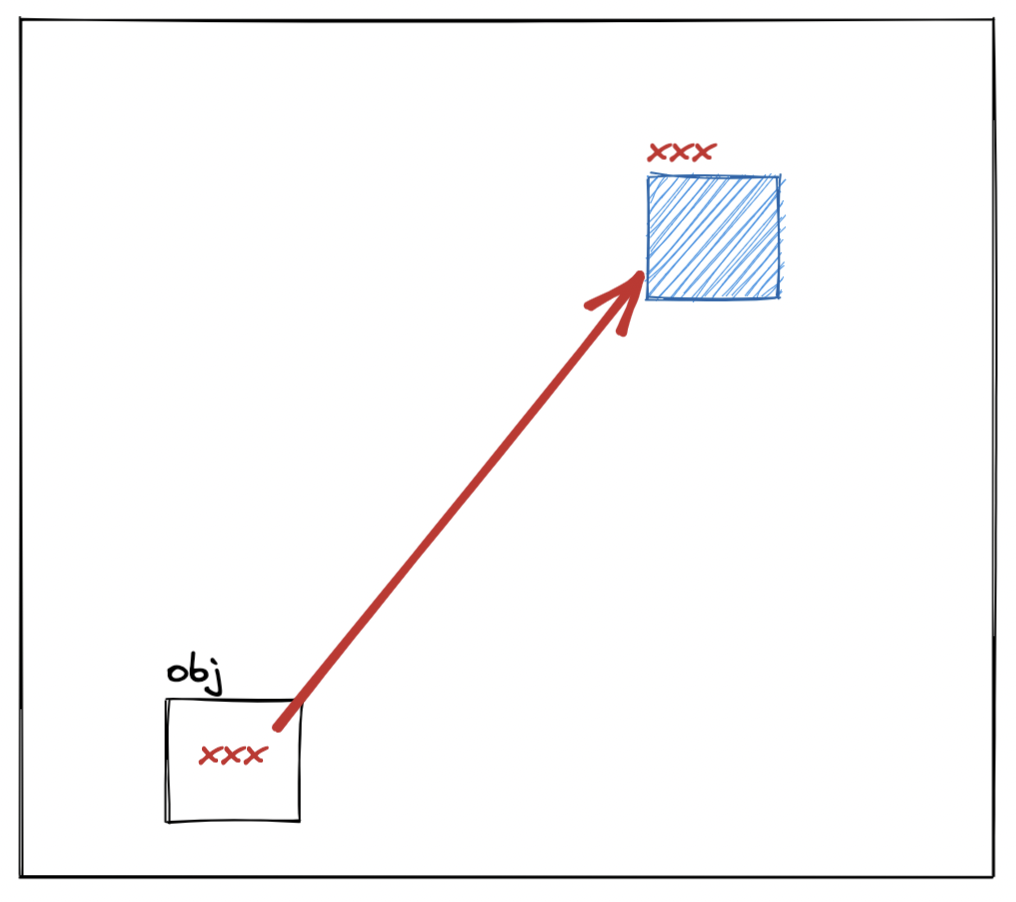
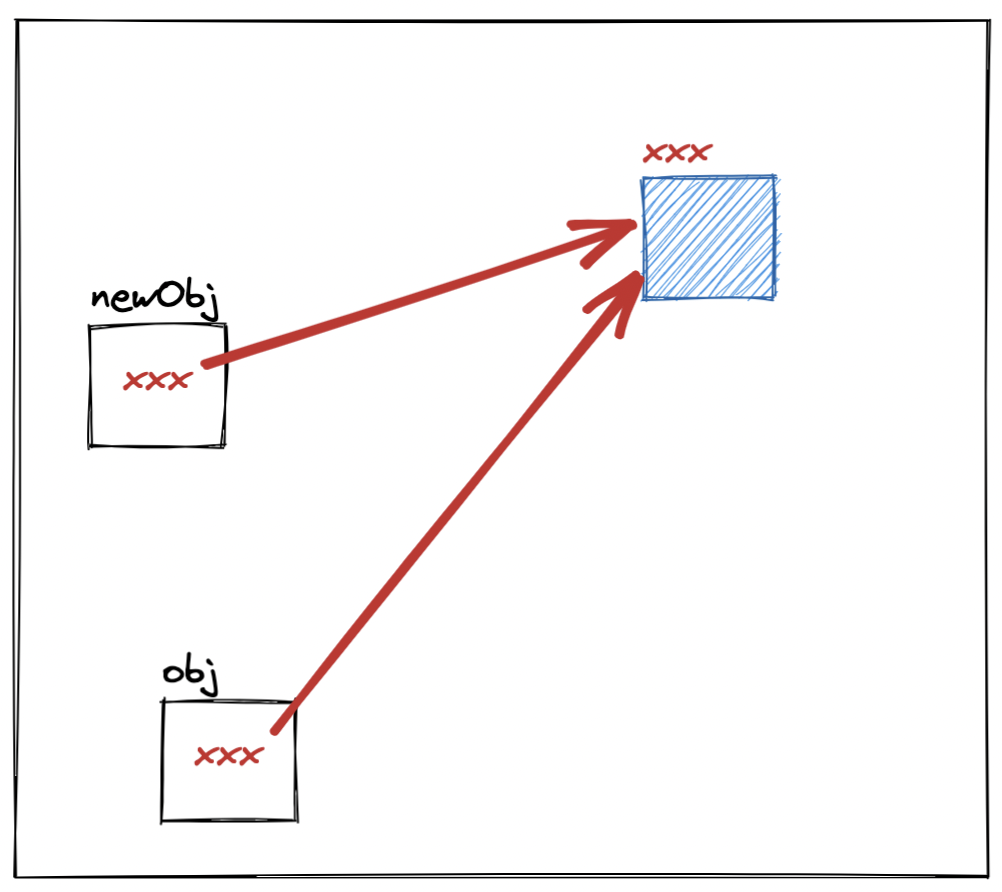
So what happens, if we copy obj to another variable, say newObj? Only the reference is copied.
Based on the gained knowledge, if there are two objects node5 and node4 as in previous section, they can be linked as:
const node5 = {
  value: "Book 5",
  previous: node4,
};
Even though, actual node4 object is stored somewhere in memory, it's reference is now stored as the value of previous.
We can also see that, if I can enter into node5 and read through the values, I can enter into node4 through node5.previous. That is how the link is established.
Implement Stack of 5 Nodes
In real world, stack is not restricted to 5 nodes. But, since we started with 5 books or nodes, let us create a stack of 5 nodes using JavaScript.
First Node
The first node stores the value of book as "Book 1". Also, since it is the first node, there is no previous node. Therefore, for the first node, we set previous property as undefined. So, here is our first node:
const node1 = {
  value: "Book 1",
  previous: undefined,
};
Second Node
Creating second node is equivalent to keeping the second book on top of first book. For the second node, the value is "Book 2" and its previous node is node1. So, here is the second node in JavaScript:
const node2 = {
  value: "Book 2",
  previous: node1,
};
Remaining Nodes
In the same line, let us figure out the next 3 nodes.
const node3 = {
  value: "Book 3",
  previous: node2,
};

const node4 = {
  value: "Book 4",
  previous: node3,
};

const node5 = {
  value: "Book 5",
  previous: node4,
};
This excercise helped us to understand how one node links to previous node. Also, we understood the changes happening when a new node is pushed to the stack.
It is now time to write the actual implementation of a stack in JavaScript.
Implementing Stack in JavaScript
In real world, a stack needs to be dynamic. It is not like, we can place only 5 books in a stack or 10 plates in a stack. We can keep on adding new items to stack, which is called pushing. Also, we can take out items from the stack, till it is empty, which is called popping. At any time, we can also find out, which item is in the top of stack.
In order to implement such a data structure, first we need a class. It's because a class can create instances and can provide methods to work on the instances.
class Stack {
  // TODO
}
Then, at any time if we need to create a new stack, we create an instance:
const bookStack = new Stack();
const plateStack = new Stack();
Head
By looking at a stack of books, our brain can easily identify which is the top most book. What about if the stacks of books are in a carton box? We cannot see which book is on top(head). We need to ask the carton box(just visualize :)), "Who is on top?" or "Who is at the head?" or "Who is the next book ready to pop?". In order to provide the answer, we need a head propery for the class.
Here is the updated Class code:
class Stack {
  #head;  // TODO
}
Length
At any time, we need to know, how may items are there in the stack. For that, we keep a public length property inside the Class. Here is the udpated code:
class Stack {
  #head;
  length;  // TODO
}
Constructor
When a new stack is created using new operator, head does not point to any node. Also, the length of stack is 0. We implement this logic by adding a constructor to our class.
class Stack {
  #head;
  length;

  constructor() {    this.head = undefined;    this.length = 0;  }
  // TODO
}
push() Method
Imagine our stack looks like a letter box.

push() method means, we are pushing a node through the opening. The node will go inside the stack and go to bottom.
The next node, pushed to the stack sits on top of previous one.
Now, let us implement push() method for our stack.
First, the push() method should accept an argument to be pushed to the stack.
class Stack {
  #head;
  length;

  constructor() {
    this.head = undefined;
    this.length = 0;
  }

  push(value) {    // TODO  }
  // TODO
}
When we push the first item, we are actually creating the first node in the stack. From the diagram earlier, we know that the first item does not have a previous node link.
Here are the steps we need to do in a push():
- Create a new node for the pushed value
- Set the previous node of new node to the current head
- Make the new node, the new head
- Increment the length of stack by 1
class Stack {
  #head;
  length;

  constructor() {
    this.head = undefined;
    this.length = 0;
  }

  push(value) {
    const node = { value };    node.previous = this.head;    this.head = node;    this.length++;  }

  // TODO
}
pop() Method
Pop is the opposite of push. So when we do a pop, following steps should happen:
- Shift the header to previous node
- Decrease length by 1
- Return the value of popped node
It can be implemented as below:
pop() {
    const currentHead = this.head;
    this.head = currentHead.previous;
    currentHead.previous = undefined;
    this.length && this.length--;
    return currentHead.value;
  }
Full Class
Here is the full class code:
class Stack {
  #head;
  length;

  constructor() {
    this.head = undefined;
    this.length = 0;
  }

  push(value) {
    const node = { value };
    node.previous = this.head;
    this.head = node;

    this.length++;
  }

  pop() {
    const currentHead = this.head;
    this.head = currentHead.previous;
    currentHead.previous = undefined;

    this.length && this.length--;

    return currentHead.value;
  }
}
We can add more methods to the Stack class.

 Joby Joseph